Showing posts with label animal print. Show all posts

Saturday, 22 August 2015

Summer of Guest Posts: Not Your Average Nails!


Hi everyone!

I have another amazing guest post today!! I asked my friend Becca from Not Your Average Nails if she wanted to make something for the Summer of Guest Posts - and oh boys and girls, did she make something awesome!

Becca decided to do a sort of tribute design to my blog - look on and be amazed! I love it so so much <3 So a big THANK YOU, Becca, for the mascotte!!

---------------------------------------------------------------

Tuesday, 26 August 2014

Guest Post at Nerdy & Fleurty!


Yay I'm doing another guest post!

This time I'm helping out over at Nerdy & Fleurty - she doesn't have her camera for a few months so she asked me if I wanted to be part of her guest post series! I created this bright tribal leopard print for her - you can go read the blog post and see more pictures (including my right hand!) here! :D

I hope you like it, and definitely go browse Nerdy & Fleurty's blog too!

Thursday, 26 June 2014

Wild Zebra Hearts - Recreation of Nail Polish Society


Hello my polish loving friends!

In today's blog post I'll be showing you my recreation of an awesome design by Nail Polish Society - you can see hers here

Thursday, 19 June 2014

Rawrrr, Neon!


Hello my blogging friends!!

I'm cheerful and happy because look, neon! I am so in a Summer mood with these nails :D Plus, I finished my papers and examsn today! Woop woop!
I did a quick neon leopard design to kick off my new blog name! What better way to celebrate Roaring Nails than by doing a leopard design, right!

Saturday, 14 June 2014

Leopard Print with Claire's School Day


Hi everyone!

Long time no see :/ Or well, a week anyway - so sorry! I've been busy writing my final paper (about Harry Potter, awesome right!) so I haven't been able to do much nail art the past week. But I'm back now!

Tuesday, 22 April 2014

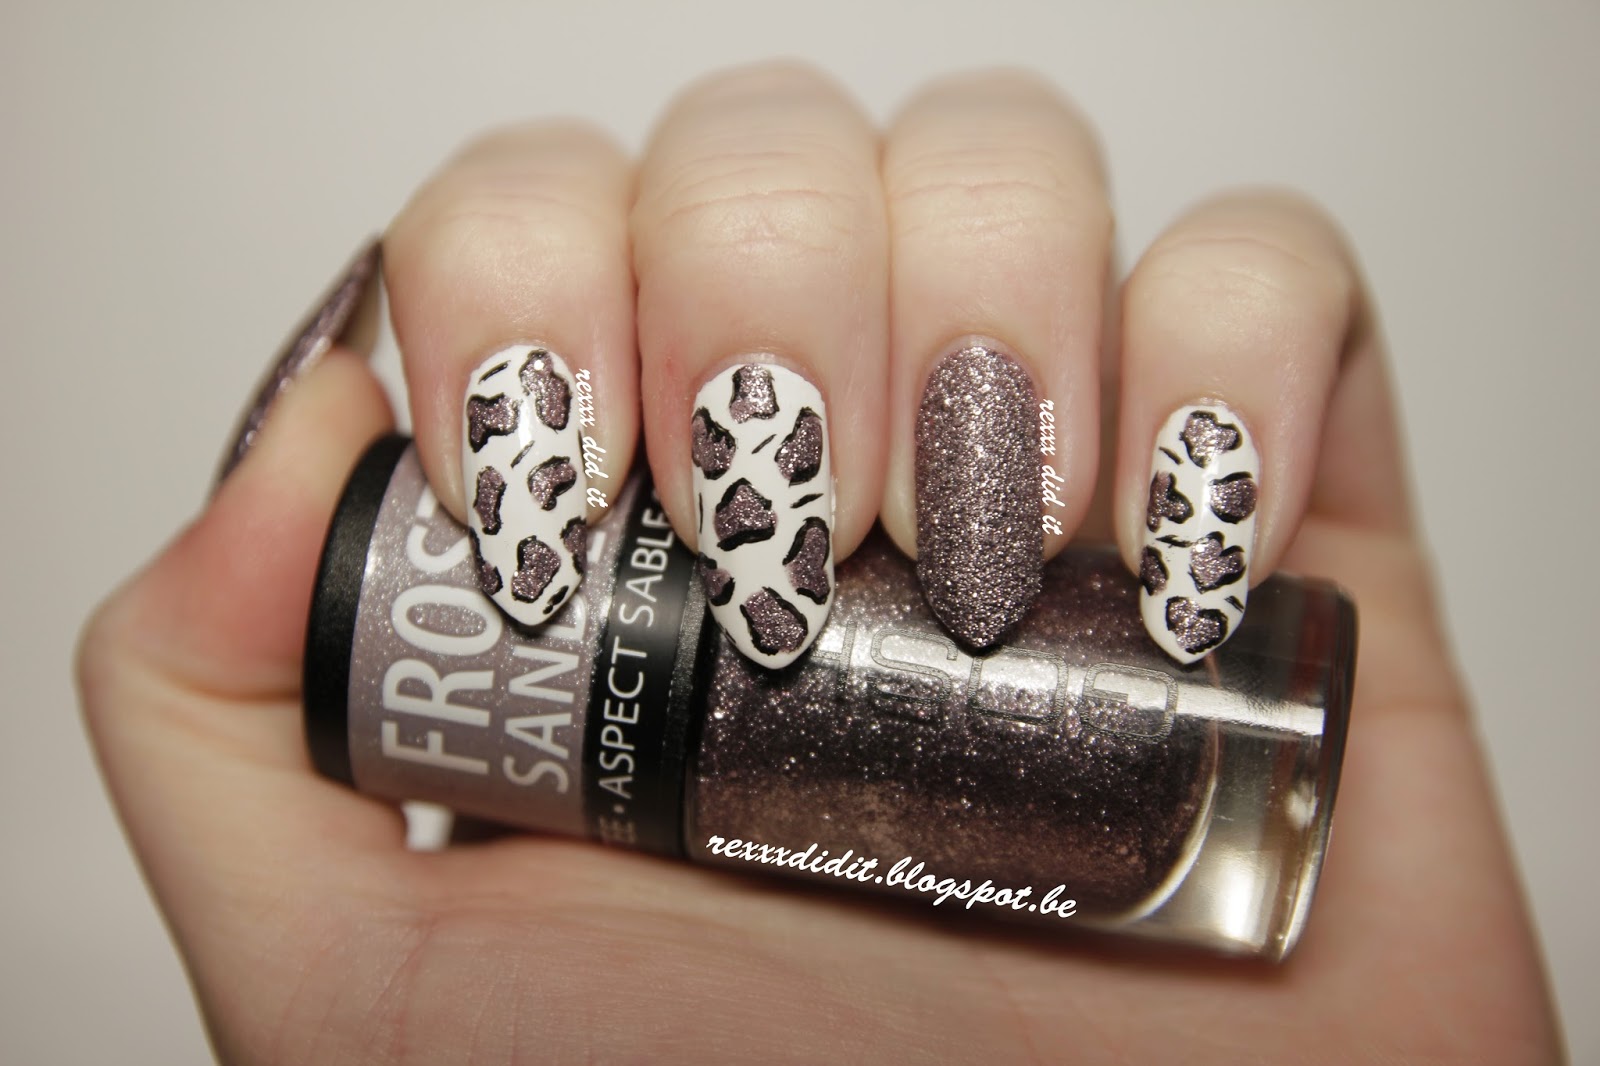
Monochrome & Textured Leopard Print


Hi everyone!

I'm really into black and white nail art lately so today's post is also about a black and white design!
I had actually planned do to something with acrylic paints but that was a total fail, so I quickly did some leopard print because that is my go-to design when all else fails and it's super late at night.


For this quick design I used: 
Alpine Snow - OPI
Frosted Purple - Gosh
Black acrylic paint


Although the name of the Frosted Sand polish is Frosted Purple, it doesn't really look purple at all. You can sometimes notice a purpleness in the polish, but it's not very obvious and if the name of the polish didn't have the word "purple" in it, I wouldn't have noticed this purpleness at all I think.


 You know how leopard print goes: three coats of Alpine Snow, make the spots with a dotting tool and then do the black outlines with a small brush.

I did the black outlines with acrylic paint because I wanted to try that out a bit - I just bought a set of 12 colours, just a cheap set so they're not very good paints but I just wanted to try acrylic paint out.

It is true that it's so much easier to work with than with polish! Now, my black polish I normally use for leopard print is a bit old, I'm halfway through the bottle so it's a bit gloopy, which I notice a lot when using it. I had no problems when using acrylic paint, it went a lot smoother than with my black polish.


I also put on a shiny topcoat afterwards because I wanted to see how the Froster Sand polish would look then. There's not a very noticeably difference, the grey looks a bit darker and glossier but that's about it:


What is your go-to design when all else fails? :)

Thanks for reading!

Thursday, 10 April 2014

Classic Leopard Print With a Twist


Hello all you fierce tigers! Or leopards, to be more in theme with today's post!

If you've followed me for a while on here, then you know I'm a sucker for leopard print. Funnily enough, I actually don't own any clothes with leopard print on them - maybe I'm overcompensating for that on my nails haha.

Today's design is the classic leopard print, but with a twist to it!


The colours I used for this design are:
Goldbusters - Catrice
Black on Black - Sinful Colors
Chocolate Chips - Only You
African Queen - Only You

I started out by painting my nails gold with Goldbusters (awesome name by the way - I always love it when a polish has a name that refers to popular culture). This golden polish is a bit more yellow than the previous one I had (Goldfinger by Catrice) and I like my old one better - I'm just not a big fan of yellow. But gold is gold I presume, so on with the design!


I then created the brown leopard spots by mixing my two brown polishes together (because the one is too light for the spots and the other one's colour is too dark) and using a dotting tool to make the uneven spots. Then I did the outline with black polish and a small brush.

I felt something was missing in this design (I think it felt a bit off because my gold polish was more yellow than the previous one and it just looked different to me) so I made black strokes.

Awkward thumb shot to show off that poor forgotten finger as well for once
I used some striping tape to get clean lines, and did an accent on my ring finger. I  first placed the studs on my nails (but without sticking it on) so I could place my striping tape just next to it, in order to get the right width of the black strokes. Does that explanation make sense? It's hard to explain it properly in English, but I hope it's clear.

I took the studs off again to paint the black strokes, took the striping tape off, and then I put the golden studs on again and sealed them in with a royal amount of top coat.

Now to be honest, I'm not 100% pleased with this design. I'm not sure why though. Maybe it's the yellow golden polish, or maybe the black strokes with studs don't really work here. I did get some compliments about my nails today, so other people seem to like it a lot, and it really did grow on my during the day. Maybe I'm just being too critical of myself :)


What do you think of this design? Raauwtch or aauwtch? (haha see that I made a leopard pun thing - I'm so funny)

Thanks for reading!

Wednesday, 19 February 2014

Bright Pink and Orange Leopard Print


Hello everyone!

Today I have a very bright leopard print mani for you!
I was a bit sick of the bad weather, the cold, and all the rain in my country, so I decided to do a very bright leopard design to cheer me up!

These are the colours I used:

Black on Black - Sinful Colors
Mate 01 - D'Orleac
The Pinky And The Brain - Catrice

I started off by painting my nails in the base colour - orange or pink, depending on which nail.


I'm a bit dissapointed in The Pinky And The Brain, I found that it doesn't cover well at all...
I got this polish for free in a promotion, and I already have a really similar bright pink, so it's not a tragedy that this one doesn't cover well, but I was still quite surprised. I needed 4 coats to hide visible nail line...

For the orange polish I needed 3 coats to get full coverage.

After I had applied the base colour, I just made small random spots in either orange or pink with my dotting tool. I let everything dry, and then I made the black lines with a small brush.


And that's it!
I topped everything off with a shiny topcoat. The orange polish is actually a matte polish, but I love it a lot when it's shiny as well (and well, since I have no non-matte orange polish yet, this one has to do for now).


I'm thinking of renaming my blog to "rexxx does leopard print" haha, I do so many leopard print designs. But I can't help it, I just absolutely adore leopard print on my nails!

Hope you like my nails as much as I do and thanks for reading!

Monday, 10 February 2014

Valentine's Day Appropriate Leopard Print


Hi everyone!

I probably say this in every post here, but again, I'm super excited about today's design! :)

As you know, it's almost Valentine's Day! I don't celebrate it to be honest, but I did got a lot of inspiration out of it this year! I decided to create a design that was as Valentine-y as possible, with lots of pink and hearts! 

My weak spot is leopard print - it must be my favourite design ever, and it's a simple one to create as well :) I also love a good gradient, so mix those two together with Valentine's Day and you get this:


The colours I used for this design are:
FM1 - D'Orleac
Muchi, Muchi - Essie
Rose Libertine - Rimmel London
The Pinky And The Brain - Catrice
Black on Black - Sinful Colors

As you can see, I started out with a white and pink gradient that I created with a sponge. I used the first three colours from the list above for this:


Then I added leopard print with the Catrice pink. I made some spots in the shape of hearts (3 on each nail) and the rest are just random shaped spots. I used a dotting tool for this.


And finally I used a small brush to add the black lines around the spots and also some little black stripes inbetween the spots where I thought the design was too empty:


That's it! Quite simple but I love the way it came out.

I did find that Muchi Muchi was actually a bit too sheer to create the gradient with. It looks more gradient-y in real life, but the camera didn't want to capture the sheer pink. Next time I'll probably use another, a bit darker pink :)


I hope you like my design! Thanks for reading! :)

Wednesday, 11 December 2013

Colourful Leopard Print


Hello everyone!

Yes, I have another leopard print design for you today - sometimes I just get sort of addicted to a pattern and I want to make it in all different colours and variations, so that's what's happening here :)

I did a colourful leopard print for this one, but did something extra as well: on my ringfinger I used rhinestones to create the leopard effect. I used blue, green, pink and yellow rhinestones and then made lines around them with black nail polish. Shiny!

For those of you interested in the colours and how I made the design:

The colours I used are:
FM1 - D'Orleac
Miss Minty - Gosh
Lapiz of Luxury - Essie
Rose Libertine - Rimmel
Mate 01 - D'Orleac
85 - Bourjois Paris
Black on Black - Sinful Colors
Let it Shine topcoat - Essie


For this design I first painted all of my nails with two colours of white. I let it dry, and then I made the colourful parts of the leopard print.

I put some nail polish of one colour on my dotting tool, and made little spots with it on my nails. Make sure that the spots are a bit random, and not perfect circles. I did this for every colour, and made sure that I had a spot of every colour on each of my nails.

I waited until it was dry and then I used a small pencil to outline the spots with black polish. But don't outline the spots completely. And then I placed some random black stripes between the spots.

However, I didn't do this for my ring finger. For this nail, I chose some rhinestones with colours close to the colours of the polishes I had used.

I painted my nail white first, and waited until it was dry. Then I painted a top coat on, to make sure the rhinestones would stick. I placed the rhinestones on my nail in a 'leopard print' sort of way: not perfect circles, a bit randomish.

Then I covered it with an unbelievably massive amount of clear topcoat, and outlined the rhinestones with a small brush and put some small black stripes in between the spots.


And that's it! I really love leopard print a lot, I find it very easy to make and it just always looks good :)

Saturday, 30 November 2013

Bright Pink Leopard Print With Gradient


Hi everyone!

I'm so in love with today's manicure! I did a light blue-green gradient with bright pink leopard print on top, as you can see.

The colours I used for the gradient are:
Lapiz of Luxury (Essie)
Miss Minty (Gosh)

For the leopard print I used:
Amazing California Love (OPI)
Black on Black (Sinful Colors)


I first created the gradient by using a piece of sponge. I waited until the polish had dried and then I did the leopard print on top. 
The green colour I used looks more baby blue in these pictures, as it does on my nails - the combination with the real blue colour just makes the green one look different, but I quite like this actually. I think these colours fit really nicely together :)


 I'm really liking this design, it's so bright and cheerful :)